| A | B | C | |
|---|---|---|---|
| 1 | 155 | 105 | 55 |
| 2 | 135 | 75 | 35 |
| 3 | 115 | 95 | 15 |
26 PyPhotoshop: Image Manipulation App
Have you ever applied an Instagram filter to your photos to instantly change their look and feel? Images are just arrays of numbers, and we can manipulate these numbers to create various effects.
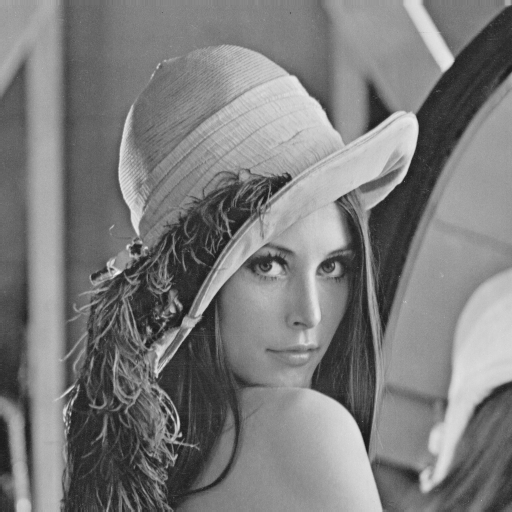
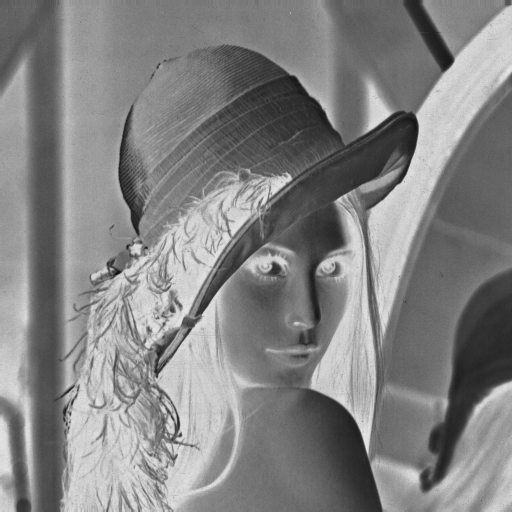
One popular effect is the “negative” filter, which inverts the colors of an image, turning light areas dark and dark areas light (see example in Figure 26.1). This concept can be directly applied to grayscale images using a simple mathematical transformation: 255 - pixel_value. The formula inverts the grayscale value of a pixel, where pixel_value is the original grayscale value ranging from 0 (black) to 255 (white).
To implement this filter effect in Python, we can read an image into a matrix, iterate over each pixel value, apply the inversion formula, and update the pixel value in the matrix. The function negative_filter should receive an image stored in a matrix (list of lists) and then process it to invert the grayscale values. For example, for an image with width 3 and height 3, the algorithm would turn the 3x3 matrix of pixel values shown in Table 26.1 (a) to the inverted matrix displayed in Table 26.1 (b). It would iterate over each cell in the matrix, apply the inversion formula 255 - pixel_value, and update the cell with the new value.
| A | B | C | |
|---|---|---|---|
| 1 | 100 | 150 | 200 |
| 2 | 120 | 180 | 220 |
| 3 | 140 | 160 | 240 |
In Listing 26.1, we provide utility functions to read an image into a matrix (list of lists) and save a matrix as an image.
# Library to read and manipulate images
from PIL import Image
import numpy as np

def get_image_as_matrix(image_path: str) -> list[list[int]]:
    """
    Read an image file and convert it to a grayscale matrix.

    Parameters
    ----------
    image_path : str
        The path to the image file.

    Returns
    -------
    list[list[int]]
        A list of lists representing the grayscale image matrix.


    Examples
    --------
    >>> get_image_as_matrix('img/lena-gray.bmp')
    [[ 0 240 240 ... 240 240 240]
     [ 0 240 240 ... 240 240 240]
     [ 0 240 240 ... 240 240 240]
     ...
     [ 0 240 240 ... 240 240 240]
     [ 0 240 240 ... 240 240 240]
     [ 0 240 240 ... 240 240 240]]
    """

    # Open the image and convert it to grayscale
    img = Image.open(input_image_path).convert('L')

    # Convert the image to a numpy array for easier manipulation
    img_array = np.array(img)

    # Convert the numpy array to a list of lists
    img_matrix = img_array.tolist()

    return img_matrix

    return df_img


def save_image_from_matrix(
        img_matrix: list[list[int]],
        output_image_path: str):
    """
    Convert a grayscale image matrix to an image and save it to a file.

    Parameters
    ----------
    img_matrix : list[list[int]]
        A list of lists representing the grayscale image matrix.
    output_image_path : str
        The path to save the output image file.

    Examples
    --------
    >>> save_image_from_matrix([[0, 240, 240, 240, 240, 240],
                                [0, 240, 240, 240, 240, 240],
                                [0, 240, 240, 240, 240, 240],
                                [0, 240, 240, 240, 240, 240],
                                [0, 240, 240, 240, 240, 240],
                                [0, 240, 240, 240, 240, 240]],
                                'img/lena-gray.bmp')
    """
    # Convert the list of lists to a numpy array
    img_array = np.array(img_matrix)

    # Convert the numpy array to an image
    img = Image.fromarray(img_array)

    # Save the image to the output path
    img.save(output_image_path)


def get_image_from_matrix(img_matrix: list[list[int]]) -> Image:
    """
    Convert an array of grayscale pixel values to an image.

    Parameters
    ----------
    img_matrix : list[list[int]]
        A list of lists representing the grayscale image matrix.

    Returns
    -------
    Image
        The image object created from the input matrix.

    Examples
    --------
    >>> get_image_from_matrix([[0, 240, 240, 240, 240, 240],
                               [0, 240, 240, 240, 240, 240],
                               [0, 240, 240, 240, 240, 240],
                               [0, 240, 240, 240, 240, 240],
                               [0, 240, 240, 240, 240, 240],
                               [0, 240, 240, 240, 240, 240]])
    <PIL.Image.Image image mode=L size=6x6 at 0x7F8D3D3D3D30>
    """

    # Convert the list of lists to a numpy array
    arr = np.array(img_matrix, dtype=np.uint8)

    # Convert the numpy array to an image
    img = Image.fromarray(arr)

    return img
In Listing 26.2, we provide the implementation of the negative_filter function that reads an image file, converts it to a grayscale matrix, inverts the grayscale values, and returns the inverted grayscale image.
def negative_filter(image_path: str)-> Image:
    """
    Read an image file, convert it to grayscale, and invert the colors.

    Parameters
    ----------
    image_path : str
        The path to the image file.

    Returns
    -------
    Image
        The inverted grayscale image.

    Examples
    --------
    >>> negative_filter('img/lena-gray.bmp')
    <PIL.Image.Image image mode=L size=512x512 at 0x7F8D3D3D3D30>
    """
    # Read the image as a grayscale matrix
    img_matrix = get_image_as_matrix(image_path)

    # Invert the grayscale values in the matrix
    img_matrix_inverted = []
    for row in img_matrix:
        inverted_row = []
        for pixel in row:
            inverted_pixel = 255 - pixel
            inverted_row.append(inverted_pixel)
        img_matrix_inverted.append(inverted_row)

    img = get_image_from_matrix(img_matrix_inverted)

    return img
Then, to get the negative of an image, you can use the negative_filter function as shown below:

26.1 Implementation
To test the snippets in Listing 26.1 and Listing 26.2, you need to have the image file lena_grayscale.bmp in the img directory. Click on Figure 26.1 (a) to download the original grayscale image of Lena.
Then, you can test the functions in the following ways:
- Copy the code snippets to a Jupyter notebook cell and run them. Notice that the
negative_filterfunction is at the end of the code snippet, and it reads the image filelena_grayscale.bmpto invert the grayscale values. - Copy the snippets to a Python script and run it using a Python interpreter. Use the
show()method to display the image, for example,img_inverted.show(). - Save the image to a file using the
save_image_from_matrixfunction, for example,save_image_from_matrix(img_matrix_inverted, 'img/lena_grayscale_negative.bmp').
26.2 Exercise 1: Image Manipulation Functions
Using the the functions to read grayscale images as matrices, implement the following image manipulation functions:
rotate_image(image_path: str, direction: str) -> Image: This function should read an image file, and rotate the image 90 degrees in the specified direction (either ‘clockwise’ or ‘counterclockwise’). The function should return the rotated image.flip_image(image_path: str, direction: str) -> Image: This function should read an image file, and flip the image in the specified direction (either ‘horizontal’ or ‘vertical’). The function should return the flipped image.resize_image(image_path: str, scale: float) -> Image: This function should read an image file, and resize the image by the specified scale factor. The function should return the resized image.crop_image(image_path: str, x: int, y: int, width: int, height: int) -> Image: This function should read an image file, and crop the image starting from the specified x and y coordinates, with the specified width and height. The function should return the cropped image.zoom_image(image_path: str, factor: float) -> Image: This function should read an image file, and zoom into the image by the specified factor. The function should return the zoomed image.
26.3 Exercise 2: Filters
In image processing, filters are used to enhance or modify the appearance of an image. Filters are applied by convolving the image with a kernel matrix. For example, consider the following matrix represents a 5x5 image:
\[ \begin{bmatrix} 0 & 255 & 255 & 255 & 0 \\ 255 & 0 & 255 & 0 & 255 \\ 255 & 255 & 0 & 255 & 255 \\ 255 & 0 & 255 & 0 & 255 \\ 0 & 255 & 255 & 255 & 0 \\ \end{bmatrix} \]
Now, consider the following 3x3 kernel matrix:
\[ \begin{bmatrix} -1 & 0 & 1 \\ -2 & 0 & 2 \\ -1 & 0 & 1 \\ \end{bmatrix} \]
To apply the kernel to the image matrix, we slide the kernel over the image matrix, multiply the kernel values by the corresponding pixel values in the image matrix, sum the products, and update the pixel value in the image matrix with the result. For example, consider the pixel at position \(p_{x,y} = p_{1,2} = 255\) in the image matrix Figure 26.2 (consider \(x\) and \(y\) starting from 0). The 3x3 neighborhood around this pixel is shown in Figure 26.4 (a), and the pixel values are shown in Figure 26.4 (b).
\[ \begin{bmatrix} p_{x-1,y-1} & p_{x,y-1} & p_{x+1,y-1} \\ p_{x-1,y} & p_{x,y} & p_{x+1,y} \\ p_{x-1,y+1} & p_{x,y+1} & p_{x+1,y+1} \\ \end{bmatrix} \]
\[ \begin{bmatrix} 255 & 255 & 255 \\ 0 & \color{red}{255} & 0 \\ 255 & 0 & 255 \\ \end{bmatrix} \]
\[ \begin{align*} p_{1,2} = & (-1 \times 255) + (0 \times 255) + (1 \times 255) \\ & (-2 \times 0) + (0 \times 255) + (2 \times 0) \\ & (-1 \times 255) + (0 \times 0) + (1 \times 255) \\ p_{1,2} = & -255 + 0 + 255 \\ & +0 + 0 + 0 \\ & -255 + 0 + 255 \\ = & 0 \end{align*} \]
In this exercise, we will implement three filters: the Box Blur Filter, the Edge Detection Filter, and the Sharpen Filter.
26.3.1 Box Blur Filter
The box blur filter is used to reduce noise and detail in an image. It works by averaging the pixel values in the neighborhood of each pixel. The formula for the blurred value of a pixel is the average of the pixel values in a 3x3 neighborhood centered around the pixel. For example, consider the pixel at position (x, y) in the image matrix img_matrix. The blurred value of this pixel is calculated as follows:
Implement the function apply_blur_filter(image_path: str) -> Image that reads an image file, applies the blur filter to the image, and returns the blurred image.
26.3.2 Edge Detection Filter
The edge detection filter is used to highlight the edges in an image. It works by detecting sharp changes in intensity between neighboring pixels. One common edge detection filter is the Sobel filter, which calculates the gradient of the image intensity at each pixel. The formula for the edge detection value of a pixel is the sum of the products of the pixel values and the Sobel kernel values in a 3x3 neighborhood centered around the pixel. For example, consider the pixel at position (x, y) in the image matrix img_matrix. The edge detection value of this pixel is calculated as follows:
Implement the function apply_edge_detection_filter(image_path: str) -> Image that reads an image file, applies the edge detection filter to the image, and returns the edge-detected image.